| |
|
|
BEGINNING WITH THE SOURCES: USING VISUAL STUDIO TO MAKE MODS
With this tutorial, we'll see how to use Visual Studio for your future developments. You'll have first a quick explanation on this software's purpose, then each element of the program will be briefly detailled to allow you to manipulate it easily. Finally, I'll give you some useful tips to make your path in the mod stuff. Once you'll be familiar with this, you'll be ready to create your applications, so take your time to understand all this !
1) What is Visual Studio ?
Visual Studio is the common base of different development environments that are Visual C++, Visual Fortran, etc... It is a group of tools that assist you in programming. Here, we use Visual C++, because the AvP Source Code was made in C & C++ languages. Just keep this in mind: Visual Studio is just the base of Visual C++.
Now put this clear in your mind: Visual C++ isn't a programming language, it's just an environment development for C / C++ based applications.
In the past, programmers used to get a simple compiler and a linker to create applications from their source code. Now, it's different: when you program in C++, you manipulate objects & associated abstract concepts that is more difficult to understand when you've got a lot of separated files.
The main role of Visual Studio is to show you every aspect of your code easily, so you can access it rapidly. The second role of it - the most important, in fact - is to manage the compiler & linker programs directly from an interface (not from command line like in DOS or Unix).
So now, you should understand why it's called "Visual Studio": it's just because of the interface ! Don't be afraid if you don't understood all this: you'll get a better idea in second part of this tutorial...
2) Interesting aspects of Visual Studio
Visual Studio is divided in different parts: we'll see that some are pretty interesting, unlike others that won't really require our attention.
Please note that I won't cover every aspect of this software, because it's not the goal of this tutorial and it would take too much time to do it since we won't use all of it's functions (plus I don't have enough knowledge to masterise all, ex.: manual compiler configuration...).
So here are the main parts of the software:
a) The menu bars
Like in every Windows applications, this software has got many menus in which every command is present. The cool thing is that you can customize your proper environment by right-clicking on a menu bar to display or hide each bar. Here are the menu bars that we'll use for AvP (feel free to use your own configuration after that...):
- The Menu Bar :

It's a classic and the mean of important ones will be explained in concerned tutorials.
- The Standard Bar

Whereas the first 9 icons are basic editing commands that can accessed in the File or Edit menu, the 3 that follows are shortcuts to hide / display the Workspace, Output panes and the third is for managing all windows in the Editor area (useful when using a lot of files...).
But the most important part of this bar is the last 3 icons: the first one will allow you to search for keywords in all your project, whereas the second one will do the same, but only in your current used file in the Editor area. We'll see little things on it on the last part of this tutorial... And for the last icon, it's just a shortcut to open MSDN (the documentation that you must install after Visual Studio...).
- The Build Bar

The last most important bar is the Build Bar that you'll use to build your application. The first list is just the name of your project, but the second list contains the current compiling mode for your project, which is really important to switch rapidly between different products. Another tutorial will explain the purpose of each mode, so don't stuck on this for now...
The next icon allows you to compile your application (browse the source code & try to find errors, then put the C / C++ code in Assembly language), the next one is used to build it (link each generated files to make one executable). The next icon (with the cross on it) can be used during a compiling process to stop it.
The final 3 icons control the execution of your application: the first one simply execute it, the second one execute it but stops if it encounters a breakpoint and the last icon is used to put breakpoints (these 2 last icons are only used in debuging process).
Remark: the Build Mini Bar is a short version of this bar, that doesn't contain the 2 lists.
Note: if you click on an icon that requires a previous action, the both actions will be executed.
Ex.: if you click on the "Build" icon, the application will be compiled first if you don't click on "Compile".
b) The Workspace pane
This is the most important pane concerning your project: it's purpose is to let you access any file and anywhere in it if desired. This pane contains 3 different tabs:
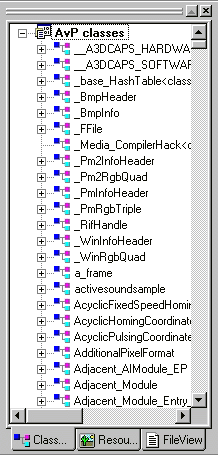
- The ClassView tab
 |
|
This cool tab retrieves all your classes, structures, functions and global variables from your project. It's really interesting when you need to find definitions on a huge project such as AvP: just select a name and the concerned file will open directly, at the line of the desired definition.
Another cool feature of this pane is that it groups each attribute and methods, by alpha sorting, in each class or structure. This way, you can have a global view on a class without browsing each source file.
To see the content of a class, just click on the "+" near it's name - as you can see in the picture - to develop it.
Note: to view all the functions & global variables, you must develop the "Global" item at the end of the list. |
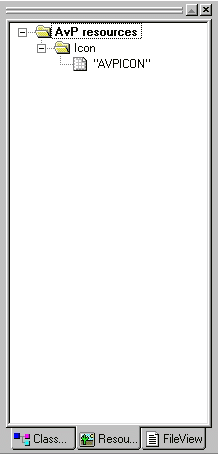
- The RessourceView tab
This tab simply allows you to have a direct access to your ressources. In AvP, there's only one ressource that's an icon for your executable.
In fact, this is the less used tab, because once you set your ressources in your projects, you just focus on the source code to handle them. In AvP, once your icon is fixed, you don't need to return to this tab...
To edit the icon, just double-click on "AVPICON". |
|
 |
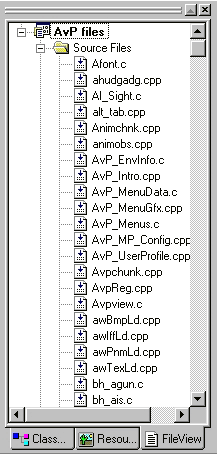
- The FileView tab
 |
|
The first tab to understand: with the FileView tab, you can have a view on all your project, i.e. all your files. In it, you'll find an alpha sorted list of the "Source files", another one for the "Header files", a third one for the "Ressource files" and a last one for the "External Dependencies"
The "Source files" are just the C / C++ / Assembly code definitions of your project. In AvP, it will refers to all defined objects, like weapons, players...
The "Header files" are the C / C++ / Assembly code declarations of your project. In AvP, it'll contains all classes definitions & functions prototypes. Also note that in some cases, definitions appear in this part (ex.: Inline.h)
The "Ressource files" is just a shortcut to the ressources (as we've seen previously).
The "External Dependencies" just contains files that are used in your project, but haven't been included in it. |
c) The Output pane
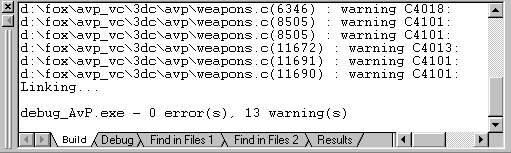
With this pane, you'll see all result messages from your actions in Visual Studio. All messages are displayed in specific parts of the pane, that you can access by clicking on the following tabs:
"Build": contains the results when building the application (if there are errors in your source code or warnings, which is the case above). To locate an error in the code, just double-click on the line in the "Build" tab.
"Debug": it's only used during debuging process.
"Find in files 1": it's used when you search a keyword in all the sources (see the "Standard Bar" above). In case that you want to make 2 searches at the same time, there's the "Find in files 2" tab.
I haven't got any clue on what the "Results" tab is... I think that it's associated with specific tools.
d) The Editor area
This is the biggest part of the software: it's the place where you'll edit your code. Nothing more, nothing less ;)
Now that you've seen the main parts of this environment development, it's time to practice. That's why I put this last section in which you'll find some of my tips to gain time while modding...
3) Some tips for your mods
In order to let you saving your precious time, I'll give you some little tips that I discovered while experimenting. This covers tips on the interface as well as tips on modding. Maybe you won't use all of these, but it's really easy to understand, so take your time reading this...
- Customize your search dialog box: by default, when you make a keyword search in all your project, some file extensions aren't taken in consideration. That's why you shoud add this in the "In files/file types" field: ;*.hpp;*.asm;*.inc
The 2 last extensions aren't really useful for AvP but can be interresting if you work with Assembly language...
- Comment your code: when you make a change in the code, you should put a kind of fingerprint to it. The advantage of doing this is to locate rapidly your proper code when there are problems. Here's what I do in this case:
1) if some original code should be deleted, I just put it as a comment by using the /* and */ C++ tags or // one. This way, if your mod should be canceled, you can backup the stuff...
2) I put my new code where I want and I add a comment at the beginning as the following: // Seb(08/18/03) ==> KICK command. This way, you know what the code does & when you put the mod.
The big advantage of creating such a fingerprint is that when you want to locate ALL your mods in AvP, you just have to make a search on the keywords " Seb(" (in this example).
Note: in every tutorials contained in this site, I prefered deleting these fingerprints so as not to overflow the code, so that doesn't mean that you musn't put these in your sources !
- Save the results of your work: in some cases, it can be useful to save the build messages of your project. One simple tip is to click on the "Build" tab (from the "Output" pane), then just press Ctrl+A to select all the messages, then you can copy it (Ctrl+C) and paste it (Ctrl+V) in a new text file, for instance.
- Search keywords in the "Output" pane: sometimes, you may need to find a line in the Build tab, for example. One simple tip is to use the feature of searching keywords (normally in the current used file), but on the "Ouput" pane. To do it, just click on the concerned tab, then make your search (see the "Standard Bar" above).
- Easy help access: when you want to find help on a special keyword (if you've got MSDN), just double-click on the word to point it, then just press F1.
- Adding / removing files in the project: you can simply right-click on "AvP files", in the "FileView" tab (from the "Workspace" pane), to add files in your project or you can select a filename and press Del to delete it (the file won't be destroyed, but taken out from the project...).
- Easy header file opening: if you're at the start of a file and want to open an included header file, don't waste your time finding it in the "FileView" tab: just right-click on the filename (ex.: #include "module.h"), then select "Open Document XXX", where XXX is "module.h" in this example.
This is it for this tutorial: the interface should now be familiar, you now know where to search informations and where to compile the code. Good luck for your mods !
|